Showing posts with label crochet. Show all posts

Wildflower Cardi Crochet Pattern

Monday, April 5, 2021


Designer wearing Wildflower Cardi.


Wildflower Cardi Crochet Pattern


The Wildflower Cardi crochet pattern is an intermediate pattern that shows off beautiful flower motifs. This fairly quick crochet pattern is the perfect garment to throw over a spring dress or even a tank top with a pair of shorts.

Shop Modesty by Laura


To purchase the inexpensive PDF pattern, please visit Etsy or Ravelry.


To pin this for later, visit Pinterest.


The Pattern


The Wildflower Cardi an intermediate crochet pattern that will require some concentration in the beginning but eventually will come with ease as you work through the repeats. This pattern has an eight-row repeat and shows a beautiful flower stitch throughout. Three panels are crocheted: the back, left and right front panels. Seaming with a tapestry needle will not be required because the panels are seamed by single crocheting the edges together. 


The Wildflower Cardi crochet pattern is a very detailed pattern that has gone through multiple calculations to be size-inclusive. With its large number of stitch repeats, the motif had to be broken down to match measurements.


The cardigan has a positive ease of 6-8 inches, which is roughly 3-4 inches of positive ease for the back panel. The front panels are purposely shorter in width to leave it as an open cardigan. 


The yarn used for this cardigan was Yarn Bee Soft and Sleek DK. Although this yarn has been categorized as a yarn weight of 3, it is more like a category 2. I highly recommend using a fingering weight yarn for this pattern.


Blocking is required to reveal the beautiful wildflowers.

The Design Story


Designer showing the back of the Wildflower Cardi.


The Wildflower Cardigan was an original piece that I designed that was supposed to be featured on Yarn Punk in the summer of 2020. However, due to the pandemic, the creator behind this blog, Vincent, offered that I keep the design for myself in hopes to help my business during difficult times. 

Crochet lacework was something that I never thought I would do but I wanted to design something that was elegant and yet made a statement for the spring/summertime. I am happy that I took on the challenge of designing this piece as it is a beautiful addition to any spring or summer look. 


The Wildflower Cardi design was finished last year and only now coming out for spring this year. The truth is, I was really scared to have this design tested because of the intricate grading that had to take place in order to offer the many sizes. 


I'm happy to report that testing for this pattern was one of the smoothest tests that I've hosted.  Down below, you can view the beautiful Wildflower Cardis that my wonderful testers have made. 


Designer wearing the Wildflower Cardi.


Testers


To see more from these makers, simply click their pictures.


Yarns Used and Yardages


XS/S: Paintbox Yarns Cotton DK- 1194 yds, Yarn Bee Soft and Sleek DK- 1085 yds, Orquidea Seda 1164 yds
M/L: Yarn Bee Soft and Sleek DK- 1000 yards, WeCrochet Comfy Fingering- 1147 yds, Yarnkart Silkwool Light Fingering Weight 1037 yds
XL/2XL: Hobbi King Cotton- 1200 yds
3XL/4XL: Vardhaman-Zaima 1270 yds, Mary Maxim Mellowspun-1479 yds


End Remarks


Find me on Facebook and Instagram. Tag me with your finished Wildflower Cardi by using the hashtag #modestybylaura.


Happy crocheting!


XO,


Laura


This post may contain affiliate links. I am paid a small commission if you make a purchase through the links on my site. Thank you for supporting my blog in this way.


Holly Earmuffs Free Crochet Pattern

Thursday, February 4, 2021


A little boy wearing earmuffs.

Holly Earmuffs Free Crochet Pattern

Do you suffer from cold ears in the wintertime? Are you looking for a fast crochet pattern to solve this problem? Crochet this one-hour earmuffs pattern to provide warmth during those cold winter days outside. You can guarantee these ear warmers to keep those cold ears warm. 

Shop Modesty by Laura

To purchase the inexpensive PDF file of this pattern, visit Ravelry.


Little girl wearing earmuffs.


To pin this pattern for later, visit Pinterest.

Design Story

If you are as big of a Korean drama fan as I am, you may have recognized more crochet and knitted items making the screen. And boy do I get super excited when the lead men of these K-dramas pick up knitting needles and start to knit and purl.

The Holly Earmuffs were inspired by the granny square earmuffs that have been getting quite popular in South Korea. To provide some fun to my design and definitely extra heat, I used faux fur yarn. In the past, I used faux yarn to create a keyhole type scarf called the Polar Bow Tie Scarf. If you are someone who gets easily cold, this scarf will do the job and keep your neck nice and warm.

The Pattern

The one-hour Holly Earmuffs pattern is crocheted using Lion Brand's Go For Faux Thick and Quick as well as Vanna's Choice. Both the motif and inner earpiece (faux fur) are crocheted separately and then sewn together later. The headpiece and straps are seamlessly crocheted to complete the project. 


Materials

-6.0 and 10.0mm crochet hooks
-tapestry needle


Materials


-Lion Brand Go For Faux Thick and Quick and Vanna’s Choice

-6.0mm and 10.0mm crochet hook

-tapestry needle


Abbreviations


ch-chain

chsp-chain space

dc-double crochet

puff st-*yarn over, insert in chsp, yo and pull up a loop; repeat from * 2 more times, yo and pull through 6 sts on your hook, yo and pull through last 2 loops

sc-single crochet

slst-slip stitch

sts-stitches

yo-yarn over


Gauge


Worsted weight: 4 sts and 2.5 rows equal an inch


Yardage


Go For Faux Thick and Quick: 13-15 yards

Vanna’s Choice: 60-70 yards


Measurements


Earpiece- 4inch diameter

Headpiece and bottom straps measurements will vary upon preferred lengths.


Notes


-Headpiece and bottom straps are adjustable to your desired lengths.

-When bottom straps are tied, the headpiece will stretch a bit, so take into consideration when crocheting the length of the headpiece. 


Earpiece (Make 2)


With your 10.0mm hook and Go For Faux yarn, make a magic circle and chain 3. Make 11 triple crochets into the circle. Slip stitch into the 2nd ch of the beginning chain 3. Fasten off. Close the circle by pulling the beginning yarn and weave in the ends.


Headpiece


With 6.0mm hook and worsted weight yarn, slip stitch 6 times into the top of one earpiece with worsted weight yarn.


Row 1: ch1, sc across

Row 2: ch2 (counts as a st), *skip a st and dc in the next st, dc into the skipped st; repeat from * one more time, dc in the last st (6)


Repeat rows 1 and 2 to desired length to reach the opposite inner earpiece. (Take into consideration that when worn, the headpiece will stretch slightly when the earmuff is tied under the chin.) Slip stitch the strap to the opposite earmuff. Fasten off and weave in the ends. 


Bottom Straps


Take an earpiece and slip stitch 6 times with worsted weight yarn directly opposite from the headpiece.


Row 1: ch1, sc across

Row 2: ch2 (counts as a st), *skip a st and dc in the next st, dc into the skipped st; repeat from * one more time, dc in the last st (6)


Repeat rows 1 and 2 to desired length. 


Repeat this on the opposite side. Crochet straps long enough to tie a ribbon under the chin. 


Young boy wearing earmuffs.


*MOTIF (Make 2)


With your 6.0mm hook and worsted weight yarn, make a magic circle and chain 3 (counts as a double crochet and a chain 1).


Round 1: *dc, ch1; repeat for a total of 10 times, slst into the 2nd ch of the beginning ch3 (11dc, 11 chsps)

Round 2: slst into the first chsp, ch5 (counts as a dc and ch2), *dc in the next chsp, ch2; repeat from * to 

the end of the round; slst into the 3rd ch of the beginning ch5

Round 3: ch3, *puff st in the next ch2 sp, ch3, slst in the next dc**, ch3; repeat from * to the end ending repeat at **


Fasten off and cut off a 40 inch tail for sewing.


Take the motifs and sew them onto the earpieces following the outline of the motif. Don’t be afraid of the opposite side. The faux yarn can be fluffed to cover the worsted weight yarn.


END REMARKS

I hope that you enjoyed this and easy crochet earmuffs pattern.

To stay connected with me, find me on Instagram and Facebook! Tag me with your makes using the hashtag #modestybylaura.

Until next time, happy crocheting!


XO, 

Laura

Modesty by Laura logo


This post may contain affiliate links. I am paid a small commission if you make a purchase through the links on my site. Thank you for supporting my blog in this way.


Middleton Market Bag Free Crochet Pattern

Thursday, June 25, 2020


Modesty by Laura crochet Middleton Market Bag


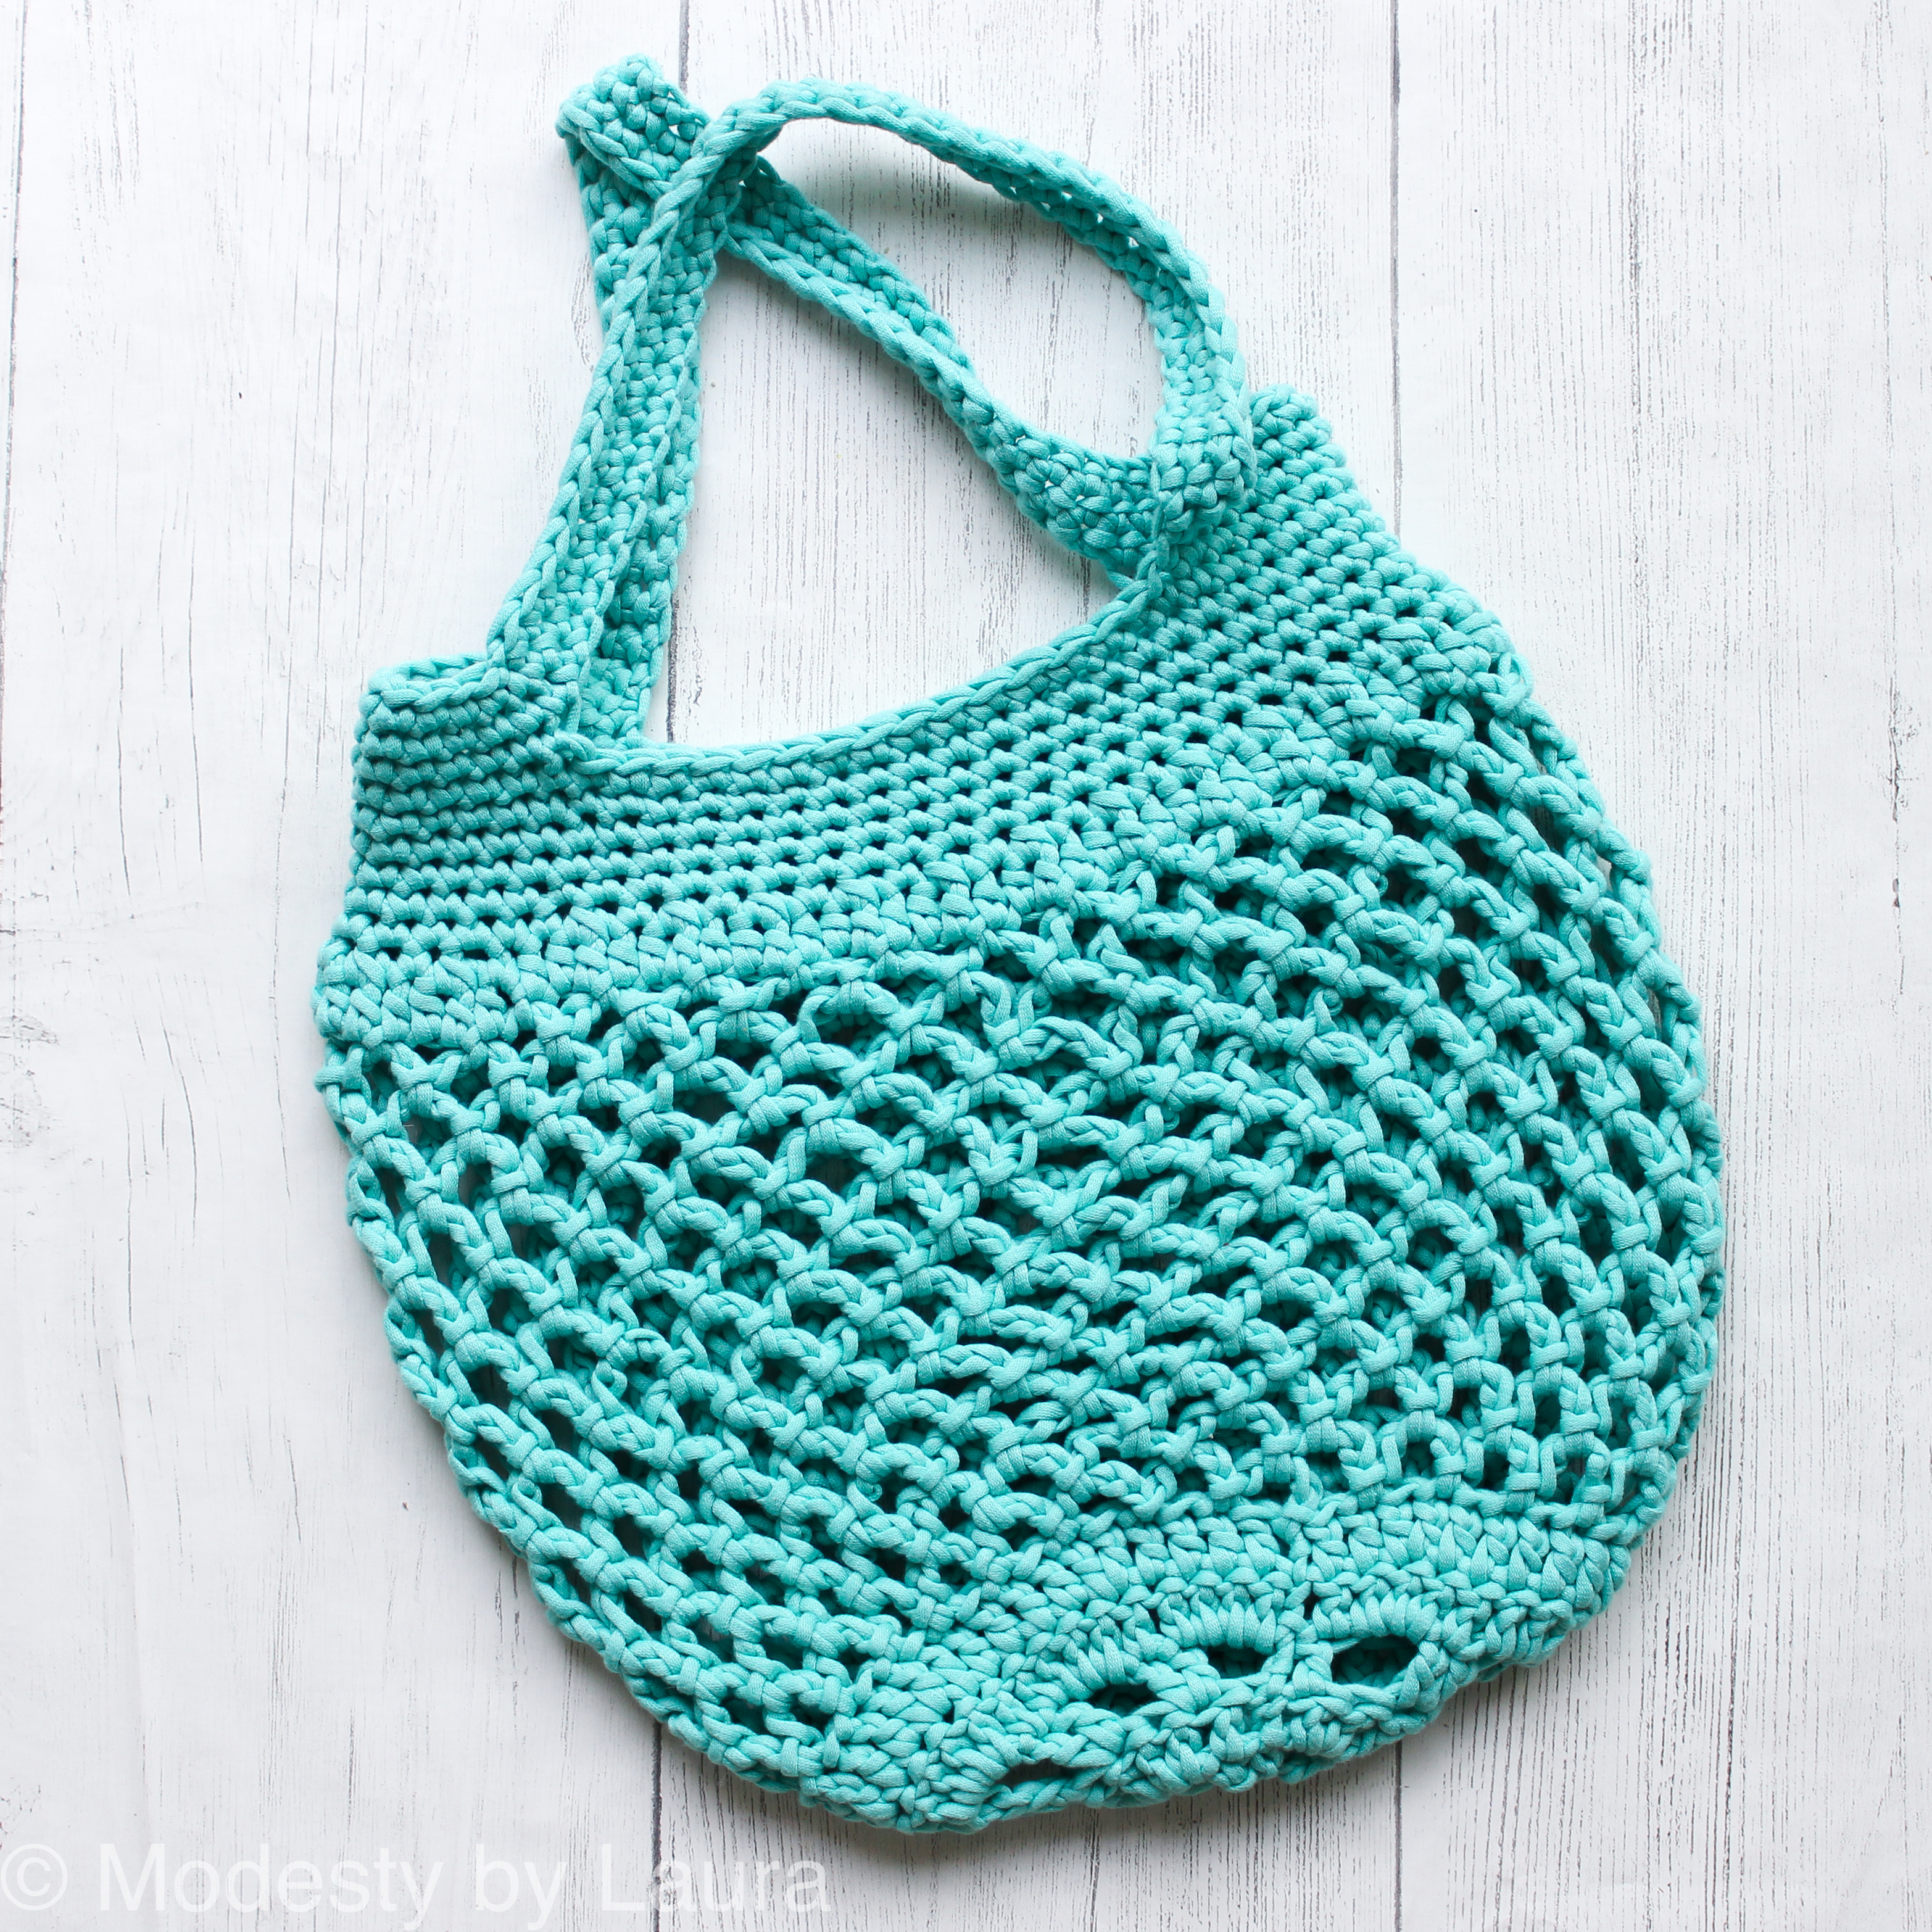
Middleton Market Bag Crochet Pattern


The Middleton Market Bag is the perfect farmer's market companion. With its classic mesh look, this beginner-friendly crochet pattern can be the perfect market day companions. Put all your favorite finds in this beautiful and quick crochet pattern. 

Shop Modesty by Laura


To purchase an inexpensive PDF version of the Middleton Market Bag, please visit Ravelry.

For more of the Middleton Bag Collection, refer to the links below.


Middleton Purse

Ravelry Etsy


Modesty by Laura Middleton Purse crochet pattern.

Middleton Tote

Ravelry Etsy


Modesty by Laura crochet Middleton Tote bag.


To pin this pattern for later, visit Pinterest.


Design Story


The Middleton Market Bag was designed last year along with two other crochet bags. The Middleton Bag Collection came about because I was at a loss for inspiration for summer wear. So, I visited the world of accessories. The Middleton Market Bag went through not 1, not 2, but 4 revisions. It was a learning experience and I enjoyed designing the perfect market mesh bag.


The Pattern


This crochet pattern is quick and beginner-friendly. It is constructed from the bottom-up starting with a magic circle and slowly making its way up with multiple chains.


Modesty by Laura Middleton Market Bag shown from the bottom.


Materials

-1 skein of Bernat Maker Home Dec
-8mm hook
-tapestry needle


Abbreviations


MR- magic ring

ch-chain

chsp-chain space

dc-double crochet

hdc-half double crochet

sc- single crochet

sc2tog-single crochet 2 together

slst-slip stitch

st-stitch


Gauge


10 sts and 8.5 rows is 4”.


Notes


The bag is worked in rounds. It is highly recommended that you use a stitch marker to mark the beginning of the round.

The chain 2 in the beginning counts of each round counts as a stitch.


Pattern


Create a Magic Ring


Round 1: ch 2, dc in the MR, *ch 2, 2dc cluster* repeat for a total of 4 times, ch2, slst at the top of the ch 2, turn your work (5 chsps)


Pull the MR closed.


Round 2: ch 2, 2dc in the next chsp, *dc in the next st, 3 dc in the next ch sp* repeat to the end ch sp, dc in the final st, slst into the top of the ch 2, turn your work (20)


Round 3: ch4 (counts as st and ch 2), 2dc in the next st, ch 2 and skip a st, *2dc in the next st, ch 2 and skip a st* dc in the last st, slst in the 2nd ch of the ch 4, turn your work


Round 4: ch 2, dc in the next st, 3dc in the next ch sp, *dc in the next 2 sts, 3dc in the next ch sp* repeat to the end, slst in the top of ch 2, turn your work (50)


Round 5: ch 2, dc in the next 4, 2dc in the next, *dc in the next 5, 2 dc in the next* repeat until you have 2 left, dc in the last 2, slst in the top of ch 2 (58)


From here we will work in continuous rounds. Mark your first chsp so you know what round you are on.


Round 6: *ch 4, skip a st, slst in the next st* repeat until you slst into the first chsp


Round 7-17: *ch4, slst in the next chsp* repeat til you slst into the first chsp of the round


Round 18: *ch3, slst in the next chsp* repeat til you slst into the first chsp of the round


Round 19:  *ch2, slst in the next chsp* repeat til you slst into the first chsp of the round


Round 20: hdc into each slst and ch starting from the next slst after the chsp you just made


Row 21: sc in the next st, *sc2tog, sc* repeat to the end


Row 22-26: sc around


Row 27: sc in the next 14 sts, ch 35, skip the next 14 sts, sc in the next 14 sts, ch 35, skip 15 sts


Row 28: sc in the next 14 sts, sc across the ch 35, sc in the next 14 sts, sc across the ch 35


Row 29-30: sc around


Slst into the next st when finished with row 30. Fasten off and weave in all loose ends.


Middleton Market Bag stuffed with DK weight yarn.

Ending Remarks


I stuffed my Middleton Market Bag with yarn. What will you be collecting in your market bag?


Keep in touch by following me on Instagram or Facebook! Remember to use the hashtag #modestybylaura with your makes!


Happy crocheting!


XO,


Laura


Modesty by Laura logo


This post may contain affiliate links. I am paid a small commission if you make a purchase through the links on my site. Thank you for supporting my blog in this way.

Monarch Beanie Crochet Pattern

Thursday, May 28, 2020


monarch beanie


The Monarch Beanie Crochet Pattern


The Monarch Beanie is a beginner-friendly crochet pattern using front and back post double crochets. The pattern is offered in both child and adult sizes. The hat offers loads of texture and will become a favorite winter accessory.


Shop Modesty by Laura

To purchase an inexpensive copy of this pattern, visit Etsy or Ravelry.


pinterest monarch beanie

To pin this pattern for later, visit Pinterest.

monarch beanie 1


The Pattern

The Monarch Beanie is worked up in a main and a contrasting color. It is worked from the bottom up and in the round making it an almost seamless project. A little seaming is required at the top of the hat. The hat is worked up with Lion Brand's Vanna's Choice but any worsted weight can be used to make this beanie.


This winter hat provides lots of texture starting from the ribbing at the base and textured front post double crochets in the body of the hat. This stitch gives it a very unique look.


Here is my youngest son enjoying the hat indoors. I've made beanies for my kids before but they really gravitated towards this particular hat.

Design Story

The Monarch Beanie was designed specifically for an event called the Crochet for a Cause which was hosted by Ashley of Edyth Blayn. The event was to crochet as many scarves and hats to give away to a local charity so that those in need could receive one. It was an amazing event and I feel blessed to have been a part of it.

End Remarks


Let's stay connected on Instagram and Facebook! Remember to tag me and use the hashtag #modestybylaura! 


I hope that everyone is well and pray that you stay safe and healthy during this time! Until next time, happy crafting!


XO, 

Laura


Modesty by Laura logo


This post may contain affiliate links. I am paid a small commission if you make a purchase through the links on my site. Thank you for supporting my blog in this way.

Honey Bee Scarf Crochet Pattern

Tuesday, May 12, 2020


The Honey Bee Scarf crochet pattern is a quick and beginner-friendly design that has the option of using one or two skeins of Lion Brand's Basic Stitch. With the help of open lacework, the scarf comes out with a nice drape.


It is a great winter accessory and this could easily be turned into a nice rectangle wrap by repeating the rows of this pattern. 


The yarn used for this scarf is by far my favorite yarn that they have come out with yet, at least the ones that I have tried.


The basic stitch yarn is a worsted weight that has 185 yards and anti-pilling, which is a plus in my book! They offer an array of color choices so I hope you can find a color that pleases you.


If you are wondering about the color choice I made for my Honey Bee Scarf, it is in Gold Heather. It has a mustard color mixed with some brown. 

Pattern

For an inexpensive ad-free version of this pattern, please visit Etsy or Ravelry.

To pin this pattern for later, visit Pinterest.


Materials Needed for This Pattern


-1 (or 2) skein of Lion Brand Basic Stitch
-6.5mm crochet hook
-stitch marker
-tapestry needle


One Skein Scarf


Two Skein Scarf


Gauge


10 sts and 12 rows equals 2 inches


Measurements


1 skein- 60” long, 4.5” wide
2 skein- 75” long, 6.5” wide


Let's stay connected on Instagram and Facebook! Remember to tag me and use #modestybylaura! Hope everyone is staying safe and healthy! Happy crocheting!

XO,


Laura


This post may contain affiliate links. I am paid a small commission if you make a purchase through the links on my site. Thank you for supporting my blog in this way.

Free Crochet Patterns-- Mother's Day Round Up

Monday, April 20, 2020


Are you having a hard time finding the perfect Mother's Day Gift? No worries, I have put together some cute, some fun, and some beautiful patterns that you can pick and choose from.


First off, I'd like to thank Nicole from Woven Tales Designs for offering her paid apron patterns for free on Ravelry just for this roundup. Grab your copy of the Nutmeg Apron and the Mrs. Nesbitt Inspired Apron. These will only be offered til the end of this month (April 2020). Go and visit her Ravelry store to find more awesome patterns!


🧶🧶🧶🧶


Mrs. Nesbitt Inspired Apron


🧶🧶🧶🧶

The Nutmeg Apron


🧶🧶🧶🧶


SPA SETS

Tea Rose Spa Set


🧶🧶🧶🧶


🧶🧶🧶🧶


3 Face Scrubbies and a Bowl


🧶🧶🧶🧶


Luxe Spa Scrubby Set


🧶🧶🧶🧶


ACCESSORIES


🧶🧶🧶🧶


🧶🧶🧶🧶


BAGS


🧶🧶🧶🧶


The Bobblelicious Bag


🧶🧶🧶🧶


Colour Block Make Up Bag


🧶🧶🧶🧶


Easy Market Tote


🧶🧶🧶🧶

Date Night Crochet Purse


🧶🧶🧶🧶


The Beach Blossoms Market Bag


🧶🧶🧶🧶


WEARABLES

Rose Finch Capelet


🧶🧶🧶🧶


Proserpina V Stitch Crochet Shawl


🧶🧶🧶🧶


The Elizabeth Shawl

🧶🧶🧶🧶


Everlasting Infinity Scarf


🧶🧶🧶🧶


Cherry Blossom Scarf


🧶🧶🧶🧶


Midsummer 3 Way Infinity Scarf


🧶🧶🧶🧶


The Pearl Shawl


🧶🧶🧶🧶


Amigurumi

Tulip Bulb


🧶🧶🧶🧶


Easy Little Cactus


🧶🧶🧶🧶


Loving You Flower Pot

🧶🧶🧶🧶


FOR THE HOME


🧶🧶🧶🧶


Rose Granny Square Afghan


🧶🧶🧶🧶


#momlife Removable Pillow Cover

🧶🧶🧶🧶


Luxe Bobbles Crochet Throw Blanket


🧶🧶🧶🧶


Beginner Herringbone Half Stitch Blanket


🧶🧶🧶🧶


Waistcoat Crochet Basket

I hope that you were able to find something that caught your eye so that you make something special for the mothers in your life this year.

Until next time, happy crocheting!


XO,
Laura


This post may contain affiliate links. I am paid a small commission if you make a purchase through the links on my site. Thank you for supporting my blog in this way.